Using Condition Editors
You may want your workflow or business process, or certain activities in your workflow or business process, to run only if specific conditions are met. You can assign:
Creating a condition
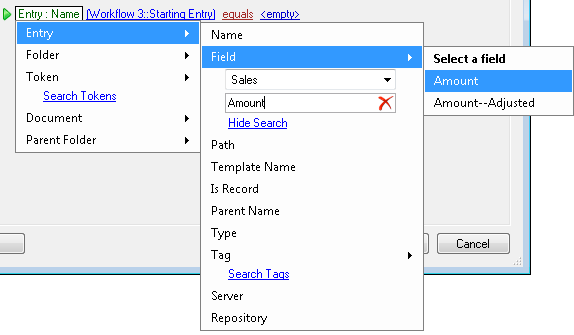
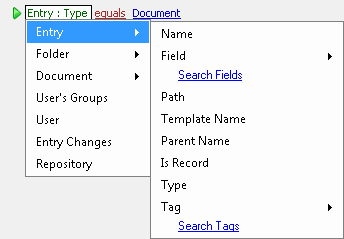
In a  condition editor, conditions are assigned through a series of nested menu options that start broad and become
more specific. Click any underlined text in the condition editor for more options.
condition editor, conditions are assigned through a series of nested menu options that start broad and become
more specific. Click any underlined text in the condition editor for more options.
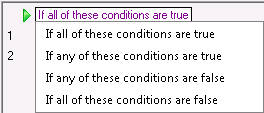
- Group Text: Click this link to choose if all the conditions in the group must be true, if any of the conditions must be true, if any of the conditions must be false, or if all the conditions must be false.
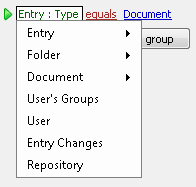
- Condition Type Text: Click these links to specify what type of entry, user, repository, or token the condition will concern. Point to some of the items in the menu to see more options, which can help you specify exactly which entries or tokens you want the conditions to apply to.
Note: Only the condition types appropriate for the current condition will be available. For example, you cannot specify token conditions in starting rule conditions, since tokens only exist after a workflow has started.
- Operator Text: Click these links to specify the logic of the condition: the relationship between the item specified in the condition type text and the value entered to the right. The operators available in this list depend on the condition type text. Show me an example.
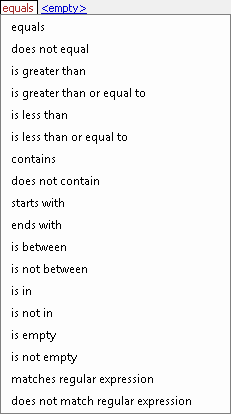
Note: By selecting matches regular expression or does not match regular expression you can use pattern matching to specify a relationship.
Example: Jason's condition concerns entries with the field "Amount." He only wants his workflow to run when an entry's field contains amounts between two numbers. Jason clicks the operator text and selects is between.
- Condition Value Text: Finish the condition by specifying a value. Depending on the operator you select in the operator text, you may see <empty>, a text box, or a text box and <empty>. Click <empty> (if necessary) and type a value in the text box(es). Click the Token button (right arrow)
 to use tokens. After you enter a value, you can click the value again to modify it. Show me an example.

Example: Jason wants his condition to be met when an entry has an "Amount" field that contains a number between 100 and 300. He clicked the operator text and selected is between. The condition editor displays a text box and <empty>. He types 100 in the text box, clicks the <empty> link, and types 300 in the second text box.
Note: If you have selected to use a regular expression, type in a regular expression or click the pattern matching button  to build a regular expression that will extract the desired information from the input. Learn more about the regular expressions I can use.
You can create as many conditions as you want by clicking Add condition.
Ordering conditions logically
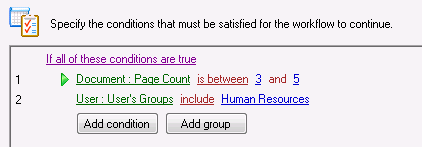
There are two reasons you may want to pay attention to the order of your conditions:
- Logical Groups: Ordering conditions into groups determines how conditions will be evaluated logically and allows you to create nested and nuanced conditions. To create a new group of conditions, click Add Group. Show me some examples of how to use condition groups.
Example: Laura wants her workflow to run if a document is created with the "Meeting Minutes" template or a folder is created with the "Travel Records" template. She specifies that she wants her workflow to run if either of these conditions are met by changing the group text at the top of the condition editor to say If any of these conditions are true. Then she creates two groups of conditions that both use the If all of these conditions are true option. Group one specifies that the Entry Type must be a Document and the Entry Template Name must be "Meeting Minutes." Group two specifies that the Entry Type must be a Folder and the Entry Template Name must be "Travel Records." If a document with the "Meeting Minutes" template or a folder with the "Travel Records" template is created, then the workflow will run. Show me what this looks like.

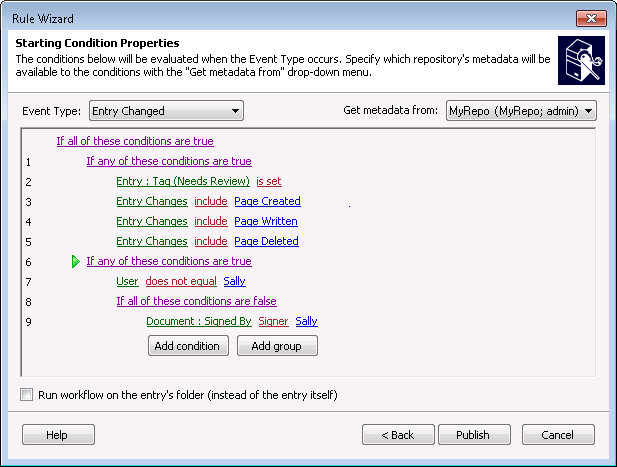
Example: Robert created a workflow that will run when a document has a page added, deleted, or changed, or if the "Needs Review" tag was set on the document. He creates a group that specifies that any of the following conditions must be true: the Entry Change event was Page Created, Page Written (when a page is edited, such as when a scanned image is replaced), or Page Deleted, or the Entry Tag" Needs Review" is set. However, he does not want the workflow to run if Sally made any of the above changes to the document and signed it. To account for this exception, Robert creates another group of conditions under the option If any these conditions are true. The first condition in the group is that the User who changed the entry was not Sally. The second condition, configured in a sub-group, specifies that Sally did not sign the document. He places both main groups of conditions under the condition that the workflow will run If all these conditions are true. Show me what this looks like.
- Performance: The way you arrange conditions can improve your performance speed. To optimize the speed at which your rules are evaluated, list the conditions that are the quickest to evaluate first such as Entry Type (Document, Folder, Series, Shortcut), Entry Path, Parent Name, Entry Name, User Name, and Entry Changes. Below those conditions, list conditions that require a connection to the repository (such as conditions based on fields, templates, tags, folder contents, and document page count) and thus take a longer time to evaluate. In most starting rules, not every condition needs to be evaluated for the starting rule to be satisfied or ignored. If a quickly-evaluated condition at the top of the list can determine if the starting rule will be satisfied or ignored, then Workflow will not need to take the time to evaluate conditions that rely on a connection to a repository. Show me an example.
Example: Kathy's workflow has a starting rule that is satisfied when someone creates a document in the "Human Resources" folder and if the document has more than ten pages. Originally, she had her conditions organized so that Workflow first checked if created documents had more than ten pages and then checked if a document was created in the "Human Resources" folder. Because her company has so many workflows and such a high document volume, performance is important. By switching her two conditions, Workflow can evaluate her starting rule more quickly.
To improve performance speed, conditions are also evaluated using short-circuit evaluation. As soon as the overall value of the condition can be determined, individual conditions will stop being evaluated. Show me an example.
Example: Dan has a starting rule that requires the following conditions to be true: when an entry is created, the entry must have the "Marketing" template and the "Needs Marketing Review" tag. Because hundreds of entries are created with the marketing template each day but only a few with the "Needs Marketing Review" tag, Workflow will spend unnecessary time and resources sifting through entries with the "Marketing" template only to evaluate the rule as false when it reaches the condition about the tag. Dan can remedy this situation by reversing the order of the starting rules.
Tip: To avoid logic mistakes and performance problems, you will often want to break complex starting rules into several simple rules.
How to order conditions
- To organize conditions into groups, click Add group. Ordering conditions into groups determines how conditions will be evaluated logically and allows you to create nested and nuanced conditions.
- To reorganize conditions and groups, drag and drop the item by clicking and dragging the item's green arrow.
- To delete a condition, right-click the condition and select Delete.
- Right-click a condition or group to cut, copy, paste, move, insert, add, and delete conditions. Inserting a condition creates the condition before the selected condition and adding a condition creates the condition after the selected condition.
Selecting entries for conditions
Some conditions require you to specify the entry that the condition will be associated with.
Note: You are not required to select entries for starting rule conditions.
Parent folder contents and folder contents conditions
The Parent Folder Contents and Folder Content conditions (and the recursive versions of these conditions) allow you to configure conditions that apply to an entry inside a folder.
Note: These conditions are only available to wait conditions and decision conditions, not starting rule conditions.
- Sub-Condition Editor: When you specify a value for these conditions a separate sub-condition editor will open so that you can specify conditions that will apply to a single entry within a folder. If the sub-condition editor specifies that any of the following conditions must be true or false, then, of all the entries in the folder, one must satisfy any one of the conditions. If the sub-condition editor specifies that all of the following conditions must be true or false, then, of all the entries in the folder, one must satisfy all the conditions. You can configure sub-condition editors the same way as regular condition editors.
Tip: Type a description of your sub-condition (which will display in blue text in the regular condition editor) to help you remember the specifics of this condition.
- The Parent Folder: Contents (recursive) and Folder: Contents (recursive) conditions let you apply folder or parent folder conditions to subfolders. Show me an example. Learn about the Folder Condition Editor.
Example: A wait condition waits for a specific document to be present in the starting entry's parent folder or subfolders. By selecting the Parent Folder: Contents (recursive) condition, the workflow will check the starting entry's parent folder and the parent folder's subfolders.
Using tokens in conditions
Tokens are available to the right side of wait conditions and to both sides of decision conditions.
Tokens on the left side of a condition
- You can use tokens on the left side of decision conditions by clicking the condition type text, pointing to Token, pointing to the activity that produced the token, and selecting a token. (Point to the workflow name to access global tokens.)
- Multi-value tokens on the left side will be treated like a multi-value field. Each value will be considered when evaluating the condition, and if any of the values meet the condition, the condition will be satisfied.
Example: Taylor places the multi-value Author token on the left side of a condition and specifies that the token must equal Bob. When the workflow runs, the token has three values: Susan, Bob, and John. The condition is satisfied because one of the token's values is Bob.
Tokens on the right side of a condition
- You can use tokens on the right side of decision conditions and wait conditions by clicking the <empty> text and clicking the Token button (right arrow) .
- Multi-value tokens on the right side of a condition are treated the same as they are in most other text boxes in Workflow; the first value of the token will be used unless an index is specified.
The Stamp Name condition
The Stamp Name condition type lets you configure conditions based on the stamps that have been applied to a document. All the stamps on the document are compared to the condition value specified on the right-side of the equation. If any stamp name on the document equals, starts with, etc. the condition value text, than the condition will be met.
Example: The "Parking Permit 123" document has the following stamps on it: Approved, Confidential, and City Reviewed. The workflow should continue if the document has the Approved stamp on it. This condition:  (Document: Stamp Names equals Approved), will check to see that Approved is one of the stamps on the document. In the case of "Parking Permit 123," this condition is met and the workflow will continue.
Example: The City of Pawnee has several approval stamps: "Approved by Leslie," "Approve It!! by Tom," and "MyApproval (Jerry)." Event permits are approved when any one of these stamps appears on the document. Using the "contains" operator, Workflow can check for the text "Approv" in any stamp name. The condition:  (Document: Stamp Names contains Approv) will be met when any of the approval stamps listed below is added to a document.
Note: The Stamp Names condition only works for stamps that do not have tokens in their text. Learn more.
Limitations on conditions
- Entry Path conditions will only be evaluated if the folder the entry is in (the direct parent folder) changes. Changes to other folders in the entry's path will not cause the entry path condition to be evaluated. Show me an example.
Example: A wait condition pauses a workflow until the starting document's Entry: Path equals "\Hiring Reports\New Hires." In most cases, this condition would be satisfied when someone moves the document into the "\Hiring Records\New Hires folder." The condition can also be satisfied by renaming the folder the document is in. For example, if the starting document is in the "\Hiring Records\Potential Hires" folder, and the "Potential Hires" folder is renamed "New Hires," the condition will be satisfied because the document's path is now "\Hiring Reports\New Hires." However, if the starting document is in the "\Recruiting\New Hires" folder, and the "Recruiting" folder is renamed "Hiring Reports," then the condition will not be evaluated, even though the document's path is now "\Hiring Reports\New Hires."
- If you combine parent folder and folder conditions in the same wait condition and the starting entry is a folder, changes to the parent folder may not be evaluated. We recommend that you use one type of condition or the other.
- When a wait condition is satisfied, two tokens are produced that indicate who satisfied the condition (User Name and User SID). However, in the unlikely event that two users make changes to the entry within a short time period, the tokens will indicate the user who made the changes that caused the wait condition to be evaluated, not necessarily the user who made the changes that caused the wait condition to be satisfied. Show me an example.
Example: A wait condition pauses a workflow until the starting document's "Status" field equals "Approved." If Joe modifies the "Priority" field on the document, the condition will be evaluated to see if the "Status" field equals "Approved." Since the "Status" field is not set to "Approved", the condition will be evaluated as false and the workflow will not continue. However, suppose that immediately after Joe modified the "Priority" field, Jane changed the "Status" field to "Approved." If Workflow encounters any delay in processing notifications, the notification that Joe made changes to the document may be received after Jane updated the "Status" field. In this case, when Workflow checks the document's "Status" field, prompted by Joe's notification, it finds that the "Status" field says "Approved." Because the wait condition has been satisfied, Workflow puts Joe's name in the %(WaitforEntryChange_Event User) token and his SID in the %(WaitforEntryChange_Event User SID) token.
- If a wait condition is satisfied the first time it is checked, no user is recorded for the %(WaitforEntryChange_Event User) and %(WaitforEntryChange_Event User SID) tokens.
 to clear your search term.